Forum and real life hackerspace help

I had quite a lot of trouble making a waveshield (a soundmodule) and an Arduino Mega work. 20 real life buttons need to trigger 20 sounds, without the involvement of a computer (it’s an installation for here). As I was using a big Arduino, the usual easy connection had to modified, which has quite some consequences on the code level and how the sound was played. An unwanted effect was distortion on the sound whilst it was playing.

In this Forum post I explain the problem – and post a possible solution as well.

Thanks again, Gregor, Brussels Hackerspace and Leandro!

How to see infrared light when you are a human.

A couple of days ago I was asked to do a little simple soldering task: attach a plug to provide current through an adaptor to a infrared lamp.
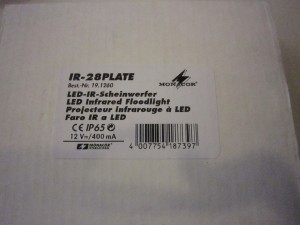
These are the specifications of the little lamp:

It was a matter of connecting the plus cable of the adaptor to the plus cable of the lamp – and the same goes for the minus.
But how do you test whether your lamp works? (ask a bee or a bird :-))
Because to your human eyes, the lamp looks like this, whether it is working or not:

So we had a little think – and then we remembered that camera’s do see infrared light (quite a few gamecontrollers work that way now as does your remote control.

This is an animation from that article on Wikipedia: “the infrared diode modulates at a speed corresponding to a particular function. When seen through a digital camera, the diode appears to illuminate purple light.”

animated gif to show how a remote control pulsates infrared light

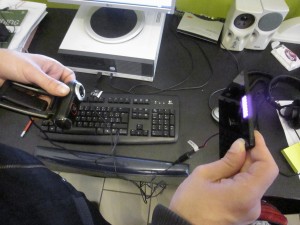
First we had the webcam have a look at this floodlight:

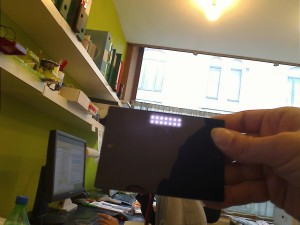
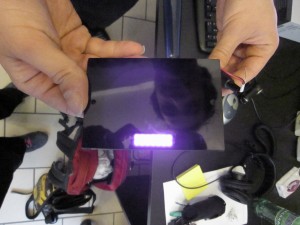
Then our regular photocamera:

It works!

(be sure not to look too long into this light)

From Arduino (5 Volt DC) to 220 Volt AC

For quite a few of the Ellentriek#11 projects, participants wanted to connect Arduino to the main current system: 220 Volt.
As this can be tricky, it’s good to look for solid solutions.
I have found a relay set-up which is safe to use with 220 volt and arduino (yeay!).

This is the little board:
http://www.sparkfun.com/products/9096
and you need of course to add all the components. The transistor and diode are essential for safety (making sure that the current only goes into one direction).

There is a tutorial on how to build it:
http://www.sparkfun.com/tutorials/119

I buy all my Sparkfun stuff here, which makes sure that you avoid the international shipping costs and the US taxes.

(I got the relay specs here)

Arduino, Processing and sensors 1

I want to visualize some date from real world sensors to my computer – they are self-made variable resistors.  For this I need to flash software on the Arduino chip, have the right libraries and use particular sketches in Processing.

Before you get to the Processing software part, you need to install Arduino. The instructions on how to do this are really good and they are here:

You can choose for adding Arduino to your repositories, or you can install the software manually.

These introductory films give you a clear insight into this construction, on how the microcontroller counts on a library and how the software depends on that too . They do however bluntly tell you that, when you work with Linux, you are on your own..  Boo!

The Arduino playground wiki is a bit confusing, but it does complement the video and one of the errors I got kindly referred me to the Processing wiki.

Here I’ll go over some Linux (in my case Ubuntu) & Processing quirks:

– Processing needs Java – if you are running Ubuntu: here I found the best tips.

– Obstacle number two to get Processing running, is making this executable:

-> Click right on the file and choose properties

Whereas you just have to choose the following – Allow executing file as a program:

Now your Processing file is executable: just double click and choose Run (it is a bash script)

– Apparently Compiz – fancy 3D graphics  – can give you trouble – so it’s best to turn it off.

– Proecssing needs Java -> you need to choose between OpenJDK of Sun Java -> when you choose Open JDK, you always get this error when you start Processing. It does work!

The next tutorial I’m following is Arduino meets Processing, physical computing and computer graphics, which dates from 2005, so I’ll check the strength of their tutorial (6 years old seems like an eternity in tutorialland…).
** Update ** This tutorial is outdated!
Go Arduino, Processing and sensors 2 for more up-to-date links.

DIY Arduino’s

For the workshop of next weekend, 6 & 7 November, we are providing the basic components of an Arduino, so the Atmega chip; a crystal and some more..

To make this microcontroller, there are several tutorials online. Here’s a list:

http://arduino.cc/en/Main/Standalone
http://arduino.cc/en/Tutorial/ArduinoToBreadboard
http://www.instructables.com/id/Perfboard-Hackduino-Arduino-compatible-circuit/
Using the components of this Instructable, but more towards a breadboard set-up, you can really easily use this tutorial by Tom Igoe:
http://itp.nyu.edu/physcomp/Tutorials/ArduinoBreadboard

http://www.instructables.com/id/uDuino-Very-Low-Cost-Arduino-Compatible-Developme/

http://www.instructables.com/id/Build-Your-Own-Arduino/
– if you want to go really minimal: http://www.instructables.com/id/Standalone-Arduino-ATMega-chip-on-breadboard/
– the lay-out of the Atmega chip: http://www.instructables.com/id/Bare-Bones-Breadboard-Arduino-Labels/

AVR Programming

A lot of physical computing set-ups work with an Atmel AVR Atmega chip, on which you flash – compile a little programme to interact with the physical reality and sensors. The most popular chips are the Atmel Atmega 168 – or 328. They are at theart of a microcontroller such as Arduino. But the chips themselves can be programmed and used as well. This is at a deeper level than programming Sketches onto your microcontroller!

In this Hackaday post the first step towards programming such a chip are set up.
In this Sparkfun tutorial they show you how to programme such a chip through Arduino.

If all goes as planned, we will try this at the next workshop! There is still time to register.

Kilo’s

One of the projects in this C, A & C – Ellentriek session will be about measuring force and good ways how to do that. After a chat with www.effiandamir.net we will probably look at scales and hacking them.

As a small preparation, I had a look for weighing scale hacks:

– Via Hackaday we are led to two projects.
hacking and monitoring
hacking scales and storing the info on an sc card

– The following links give ideas – but none of them are worked out in detail:
http://forums.makezine.com/comments.php?DiscussionID=6052
— From the Arduino forum: http://www.arduino.cc/cgi-bin/yabb2/YaBB.pl?num=1221027834 & http://www.arduino.cc/cgi-bin/yabb2/YaBB.pl?num=1231217442/15

The great internet migratory box of electronic junk

This is for all electronics freak that have a box of stuff
to-be-used-someday.

TgimboejLogo
From their website:

“TGIMBOEJ, The Great Internet Migratory Box Of Electronics Junk is a
progressive lending library of electronic components. An internet meme
in physical form halfway between P2P zip-archive sharing and a flea
market. It arrives full of wonderful (and possibly useless) components,
but you will surely find some treasures to keep. You will be inspired
look through your own piles, such as they are, and find more mysterious
components that clearly need to be donated to the box before it is
passed on again.”

http://tgimboej.org

Let’s share our junk !! 🙂