MakeyMakey – versions

Makey Makey is a nice and fun Open Hardware project, developed by Mit researchers Jay Silver and Eric Rosenbaum.  It’s an Arduino based project that could get started through crowdfunding.

Basically you can turn any conductive surface into a sensor: bananas and other fruit/vegetables, cutlery, water, metal tools, conductive dough, human skin…When you connect to the ground, you trigger certain parts of your keyboard: the arrow keys, space bar and the left click of the mouse.

“Using the MaKey MaKey you can make anything into a key (get it?) just by connecting a few alligator clips. The MaKey MaKey is an invention kit that tricks your computer into thinking that almost anything is a keyboard. This allows you to hook up all kinds of fun things as an input. For example, play Mario with a Play-Doh keyboard, or piano with fruit!

The MaKey MaKey uses high resistance switching to detect when you’ve made a connection even through materials that aren’t very conductive (like leaves, pasta or people). This technique attracts noise on the input, so a moving window averager is used to lowpass the noise. The on-board ATMega32u4 communicates with your computer using the Human Interface Device (HID) protocol which means that it can act like a keyboard or mouse.” [Via Sparkfun]

The explanation sounds harder than it is – have a look at some video’s of MakeyMakey in action and you will see what it can do.

As this is an Arduino based controller, we wanted to have a look inside. How legible/reproducible is Makey Makey?

—-> Answer, quite legible, if you have some knowledge of pcb’s, coding and microcontrollers.

—> All online:

Schematic
Eagle Files
Github Home (Find the latest MaKey MaKey sketch here)
Getting Started Guide
MaKey MaKey Driver (For Windows users)
MaKey MaKey Arduino Addon (Unzip to your Arduino sketchbook directory)
MaKey MaKey Site
Firmware Note

We wanted to check this out for ourselves and we got an Arduino Leonardo (only this model works with your computer using the Human Interface Device (HID) protocol) and six 20MegaOhm resistors (that’s a lot of Ohm!).

Success! Here’s how to make your own version (here is the subtitle zip  file)

We modified the code somewhat, you can download a zip of it here: makey_makey_SIMPLIFIED_Code_for Leonardo

A video of our DIY MakeyMakey-Leonardo in action –> @ Mixxit in Strombeek

And loads of pictures –> building and trying it out..

Charger – battery compatability

For a project this set-up was bought:
https://shop.sensestage.eu/nl/batterijen/28-battery-kit-small-400-mah.html

It consists of a Polymer Lithium Ion battery (3.7V) with a capacity of about 400 mAh and a LiPo Charger Basic – Mini-USB.

Now, for another project we have a Li-Ion recheargable battery, 3.6 Volt
(for example this one)

Now, the question is if the button cell battery can be charged with the LiPo Charger Basic?

Tested Arduino Shields and the used libraries

*// MP3 Player Shield plays mp3s that come from a Micro sd card.

* Excellent library of Bill Porter, which simplifies the code and usage a lot. You should unzip the library and put the two subfolders in your sketchbook Libraries folder. (follow the instructions:-))

* works out of the box with this library

* pay attention to the Baud Rate of the sketch and the Baud Rate of your Serial Monitor window


*// Waveshield plays any uncompressed 22KHz, 12bit, mono Wave (.wav) files of any size from an Sd-card

* It’s a kit you have to solder

* Not all Sd-cards work, it is quite finicky about that

* You need to format the Sd-card first

* There are two libraries you can use

-> AFWave, the old library has possible Sd-card issues. The nice thing about this library is the example that enables you to change the bitrate of the sound (speed it up, or slow it down). I have not seen any examples of this usage with the new Waveshield library. The bolwerk Djette uses this library

-> Wave HC, the library which is still being adapted. The active development part is nice, the coder who made the library is still following. I do find the code in the sketches themselves still quite difficult and muddy, but I’m afraid that has more to do with my coding capacities


*// Waveshield for Arduino Mega (special hack)

* A lot of the times, if you want to use a shield on an Arduino Mega, you need to change certain pin settings (which mostly leads you to cut of certain pins and reconnect them elsewhere on the Mega) Here I got into deeper trouble, my sound was distorted, and I found the solution with help from the physical and the virtual world.

* Pins used and more info at the Arduino shield list


*// Motor shield: with this shield you can easily test motors, give extra power etc

* It’s a kit you have to solder

* Libraries and instructions are here

* This shield got tested in a previous Ellentriek session

* Pins used and more info at the Arduino shield list


*// RedFlyShield is a plug-on module with WiFi/WLAN for Arduino. Download scr.zip from link, unzip and copy the content of /examples/ and /libraries/ to your Arduino folder: /arduino/examples/ and /arduino/libraries/. If there are existing folders from a previous installation,delete them before copying.

* works out of the box with this library, WLANscan scans the available wifi-networks


*// Nanode (not a shield, but web enabled Arduino with ethernet access)

* Tested in the Brussels Hackerspace


— Untested shields

*// Micro sd shield

* You need to install the Fat16 library

* Pins used and more info at the Arduino shield list


*// Lol shield, 133 leds become a screen

* Here’s a tutorial on how to make it and a demo on how to use it:

* To make animations with the Lol shield, Jimmy Rogers put nice .ods spreadsheet on his website

* Pins used and more info at the Arduino shield list


*// GPS Log shield kit

* Pins used and more info at the Arduino shield list


*// Arduino Ethernet Shield


*// WiFly Shield

* Pins used and more info at the Arduino shield list

Arduino Shield List

Here is a great database of Arduino shields that gives you pin usage details for 285 shields from 114 makers!

This list makes sure you can look at the compatibility of shields and it also lists the actual licences the shield developers use. It is quite confronting to see that the majority of the shield hardware developers do not choose a license…

From the website itself:

“Sick of trying to figure out which pins are used by some obscure Arduino shield? Can’t tell whether two shields will be compatible with each other?

This shield database arose out of a discussion on the Arduino Forums about the need for a comprehensive online reference for shield pin assignments. It lists as many Arduino shields as I can find along with their pin usage, making it easy for you to determine if particular shields are compatible.”

He does seem to be falling behind on processing the newer shields:

“Submission Queue
There are currently 198 shields submitted that I haven’t got to processing yet. Sorry!”

Anyone out there who wants to lend a helping hand?

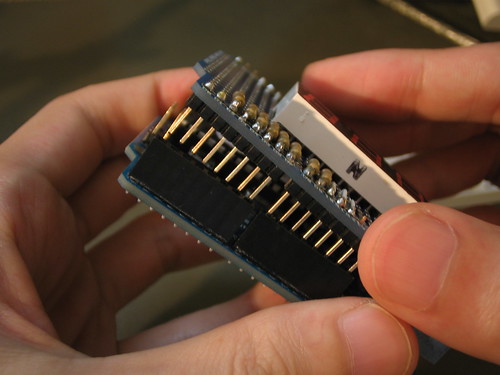
Ellentriek #15 meets Code, Arts & Crafts : Shielded – extend your Arduino

Attribution-NonCommercial 2.0 Generic (CC BY-NC 2.0)  by http://www.flickr.com/photos/35498631@N03/

        (CC BY-NC 2.0) Some rights reserved,

image

        by

_kzr

@ iMAL, Saturday 28.04.12 & Sunday 29.04.12
30 Quai des Charbonnages Koolmijnenkaai 30 – 1080 Bruxelles Brussel 1080

With an Arduino you can collect a lot of sensor data, from smelling gasses to measuring temperature or light and lots more. But how do you save these data? How do you actuate the outside world, transfer bits and bytes online, without using a computer?
In order to activate motors, to connect to a network, to make an autonomous interactive sound installations, you need chips and components on top of your microcontroller.
These usually come in the form of a shield that slides onto your Arduino. During this ’Ellentriek meets Code, Arts and Crafts’ weekend we’ll review several of these “shields” in detail. We will scrutinize these shields and look at the possiblities to make them ourselves.

With extra brainpower of Mr Stock from Rotterdam & Stephane Noel!

– As usual, this session is open to artists’ own projects.
– This is for people who already know how to work with Arduino
– Maximum 15 participants
– from 12 to 18h
– This workshop costs 20 euro, including a lunch with sandwiches & drinks (2 days)

To enroll, click here!

– For more direct information: wendy @ constantvzw . org

This Edition of Ellentriek is a collaboration between Constant vzw, Pianofabriek kunstenwerkplaats & iMAL

Ellentriek Valies: The making of

We are making the Ellentriek Valies, a travel trunk full of tools, electronic goodies and microcontrollers. You can use the suitcase to start tinkering with interactive electronics wherever you wish.

We had quite some dilemma’s to deal with:
– what kind of trunk do you choose: a real tool case (heavy), a travel trunk?
– what is absolutely necessary if you want to tinker with basic electronics?

Here are a few lists that inspired us:
—> http://www.makershed.com/Ultimate_Microcontroller_Pack_p/msump.htm?Click=37845
—> http://www.makershed.com/Mintronics_Survival_Pack_p/mstin2.htm
—> http://spectrum.ieee.org/geek-life/hands-on/diy-essentials/0

After the trunk was chosen, a light-weight, sturdy 2 wheeled red chunk of plastic, you have to customize it, make it ready for tools.

Here are some images of dressing up the trunk. Rosalie Stevens did the nice design and sewing work, I was part of making (dumb labour :-)).

What tools have to go in there?

In the middle there will be a tool insert, fabric over wood.

A first possible lay-out of tools:

This is the fabric and elastic that will hold the tools:

The one thing which got finished today was putting the Crickx letters on the outside.

I’m afraid that we did mix italic with non-italic, with different sizes.. It looks great! Thanks a lot Uberknackig for sticking the letters on the trunk. I had sticking fear..

Still quite some work ahead of us…

Contact us if you want to use the Valies.

Ellentriek #14: sew – measure – send – receive

When?
Friday 13/01/2012 – 11:00 > 19:00
Saturday 14/01/2012 – 11:00 > 19:00
Where?
Timelab, Brusselsepoortstraat 97 – 9000 Gent

This Ellentriek is about textile, electronics and wireless interaction. We will focus on soft sensors made with textile and on how you can communicate the results of these sensors to an Arduino and/or computer. This data transfer will be wireless, with xbees.

Ellentriek is a series of workshops, often collaborative, where artists can come and work together on their own artistic electronics projects, made with open hardware.

Naomi Kerkhove and her fabulous miniature worlds with needle and wire is a special guest of this session, with her ‘Valies’ project, which premiers in Vooruit in autumn. She will work on the sensor part of her performance during the workshop.

With the following experts:
Marije Baalman – http://www.nescivi.nl/
XY Interaction – http://xyinteraction.free.fr/wiki/

This Ellentriek is a collaboration between Timelab, WP Zimmer, Constant & Pianofabriek Arts Lab.

Links:
http://www.timelab.org
http://www.constantvzw.org 
http://www.pianofabriek.be/kunstenwerkplaats

pleas enroll on www.timelab.org
If you have any questions, contact wendy attt constantvzw . org
Max amount of participants: 12

Export to Dakar

One of the Constant members is going to Dakar, to give a workshop, and lots more. So for this, we decided to give some pretty chips to take along- electronics are not so easy to get in Senegal.

We got a gift from the Brussels Hackerspace:

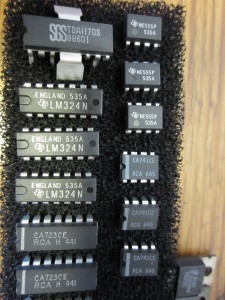
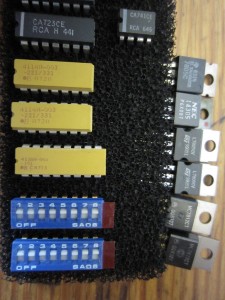
Most chips are really classics, versatile and very practical:

A few 555 timers, opamps, pretty blue dip switches – there was very little time to get this package together.
So – enjoy, it in Senegal!