Arduino Shield List

Here is a great database of Arduino shields that gives you pin usage details for 285 shields from 114 makers!

This list makes sure you can look at the compatibility of shields and it also lists the actual licences the shield developers use. It is quite confronting to see that the majority of the shield hardware developers do not choose a license…

From the website itself:

“Sick of trying to figure out which pins are used by some obscure Arduino shield? Can’t tell whether two shields will be compatible with each other?

This shield database arose out of a discussion on the Arduino Forums about the need for a comprehensive online reference for shield pin assignments. It lists as many Arduino shields as I can find along with their pin usage, making it easy for you to determine if particular shields are compatible.”

He does seem to be falling behind on processing the newer shields:

“Submission Queue
There are currently 198 shields submitted that I haven’t got to processing yet. Sorry!”

Anyone out there who wants to lend a helping hand?
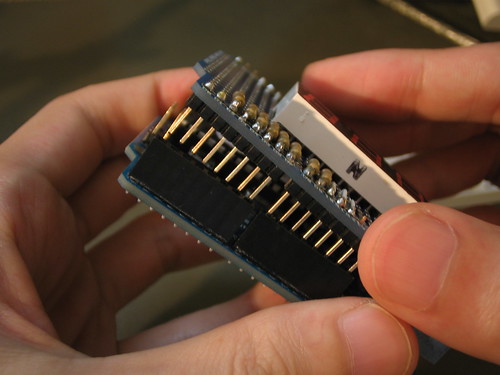
Ellentriek #15 meets Code, Arts & Crafts : Shielded – extend your Arduino

Attribution-NonCommercial 2.0 Generic (CC BY-NC 2.0)  by http://www.flickr.com/photos/35498631@N03/

        (CC BY-NC 2.0) Some rights reserved,

image

        by

_kzr

@ iMAL, Saturday 28.04.12 & Sunday 29.04.12
30 Quai des Charbonnages Koolmijnenkaai 30 – 1080 Bruxelles Brussel 1080

With an Arduino you can collect a lot of sensor data, from smelling gasses to measuring temperature or light and lots more. But how do you save these data? How do you actuate the outside world, transfer bits and bytes online, without using a computer?
In order to activate motors, to connect to a network, to make an autonomous interactive sound installations, you need chips and components on top of your microcontroller.
These usually come in the form of a shield that slides onto your Arduino. During this ’Ellentriek meets Code, Arts and Crafts’ weekend we’ll review several of these “shields” in detail. We will scrutinize these shields and look at the possiblities to make them ourselves.

With extra brainpower of Mr Stock from Rotterdam & Stephane Noel!

– As usual, this session is open to artists’ own projects.
– This is for people who already know how to work with Arduino
– Maximum 15 participants
– from 12 to 18h
– This workshop costs 20 euro, including a lunch with sandwiches & drinks (2 days)

To enroll, click here!

– For more direct information: wendy @ constantvzw . org

This Edition of Ellentriek is a collaboration between Constant vzw, Pianofabriek kunstenwerkplaats & iMAL

Arduino, Processing and sensors Part 2

In my search for up-to-date tutorials on connecting sensors to Processing I found a few valuable threads.
They are clear, the code is GPL, the aesthetics are – well I guess not my taste – but opinions are very easy to get by – good tutorials – less easy to find (=a critical compliment). Jeremy goes a step further than the usual Hello World “Blink a led sketch”. I didn’t do what he does at 20 years old.

He starts with an introduction to Arduino:
http://jeremyblum.com/category/arduino-tutorials/

In tutorial 6 he already goes from receiving information from a sensor to sending out serial information for Processing to receive.
Tutorial 7 continues on this visualizing sensor information thread.

These two tutorials combined with this one from the Arduino playground website, will hopefully enable me to visualize my flex sensor data – my deadline is tonight. (GloupsGulpSlik)

Found through the use of a search engine and this blogpost.

From Arduino (5 Volt DC) to 220 Volt AC

For quite a few of the Ellentriek#11 projects, participants wanted to connect Arduino to the main current system: 220 Volt.
As this can be tricky, it’s good to look for solid solutions.
I have found a relay set-up which is safe to use with 220 volt and arduino (yeay!).

This is the little board:
http://www.sparkfun.com/products/9096
and you need of course to add all the components. The transistor and diode are essential for safety (making sure that the current only goes into one direction).

There is a tutorial on how to build it:
http://www.sparkfun.com/tutorials/119

I buy all my Sparkfun stuff here, which makes sure that you avoid the international shipping costs and the US taxes.

(I got the relay specs here)

Arduino, Processing and sensors 1

I want to visualize some date from real world sensors to my computer – they are self-made variable resistors.  For this I need to flash software on the Arduino chip, have the right libraries and use particular sketches in Processing.

Before you get to the Processing software part, you need to install Arduino. The instructions on how to do this are really good and they are here:

You can choose for adding Arduino to your repositories, or you can install the software manually.

These introductory films give you a clear insight into this construction, on how the microcontroller counts on a library and how the software depends on that too . They do however bluntly tell you that, when you work with Linux, you are on your own..  Boo!

The Arduino playground wiki is a bit confusing, but it does complement the video and one of the errors I got kindly referred me to the Processing wiki.

Here I’ll go over some Linux (in my case Ubuntu) & Processing quirks:

– Processing needs Java – if you are running Ubuntu: here I found the best tips.

– Obstacle number two to get Processing running, is making this executable:

-> Click right on the file and choose properties

Whereas you just have to choose the following – Allow executing file as a program:

Now your Processing file is executable: just double click and choose Run (it is a bash script)

– Apparently Compiz – fancy 3D graphics  – can give you trouble – so it’s best to turn it off.

– Proecssing needs Java -> you need to choose between OpenJDK of Sun Java -> when you choose Open JDK, you always get this error when you start Processing. It does work!

The next tutorial I’m following is Arduino meets Processing, physical computing and computer graphics, which dates from 2005, so I’ll check the strength of their tutorial (6 years old seems like an eternity in tutorialland…).
** Update ** This tutorial is outdated!
Go Arduino, Processing and sensors 2 for more up-to-date links.